Apricot White Chocolate Scones:
“You’d want to make sure that you got someone with a light hand to teach you pastry.” – Maeve Binchy, Evening Class

“I want a man with a slow hand.” – The Pointer Sisters
Gawd. It’s still snowing. Just yesterday morning I remember seeing my backyard for the first time in a week (due to torrential rain and random 60 degree day), and now I can barely see my tiny car. Well at least I’m not at work! Adult snow days aren’t as much fun as when I was a kid. I actually have things I’d like to get done at the office, deadlines are approaching, and a Shining-like cabin fever sets in within minutes of waking. I eye my husband speculatively, wondering where we keep the axe. My dog takes three steps into the mess, pees on the deck, and demands re-entry. It’s too deep for her to squat, so she just stood there.
Have you ever heard the phrase “light hand” in baking? It’s one of those vaguely cheffy terms that is never adequately explained. What it seems to mean is cold hands. In this recipe, we’re going to dice the butter and mix it in with the flour, but the butter needs to stay in little pieces covered in flour – not turned into a paste. Working the dough with warm hands will melt the butter, ruining everything and canceling Christmas. Currently, I have cold hands. The second winter storm in as many weeks has descended upon my city, and current snowfall is estimated at 14 inches. I have to wonder if I really live in the South, as I always assumed I do. Regardless, I drive a Corolla, the snow comes up over the top of my boots, and I’m not leaving the house today. Might as well bake.
No, I’m not attempting pastry. I’ve made pie crusts, and I hope to someday make homemade croissants, but today’s project is scones. I used to do this every day, so let’s hope I still have the knack. This recipe is adapted from someone’s foggy memory of how we used to make scones at a coffee shop I worked in many many years ago. I got an itch to mix some up a couple years ago and contacted the baker from back in the day. He gave me a basic outline and I’ve kind of refined the quantities, of which I am absurdly proud – I mean baking is a science guys. You can’t just wing it.

Here we have:
2 lbs. bread flour
2 ½ tablespoons baking powder
¾ lbs. butter (3 sticks!)
2 teaspoons salt
2 tablespoons sugar, plus 1 tablespoon for later
2 ¼ cups half & half (not pictured – I forgot. Again.)
1 egg
And plain scones, lovely though they may be, aren’t that exciting, so let’s add the following:

1 cup white chocolate chips
¾ cup dried apricots (chopped)
¾ cup chopped walnuts
You can use any mix of dry ingredients for fun – chocolate chips, diced ham and cheddar, etc. Go crazy.
First preheat the oven to 375, and line two cookie sheets with parchment paper. Your oven may vary. Mine is an uneven jerk, so I have to put the rack all the way up on the top notch so the bottoms don’t burn. (But here’s a fantastic tip I figured out all by myself – if you burn the bottom of your scones, biscuits, buns, or whatever, use a microplane grater to scrape the black/brown bits off the bottom! The fine grater files away the nasty bits without tearing your scone.) Mix the dry ingredients well in a mixer, using the dough hook.

Dice the butter into as small pieces as you can. Work quickly with your icy, fork-like hands. Put Mount Saint Butter into the fridge to chill further until it’s time to add it.

Add your filling ingredients and let them mix in well, then quickly add the butter. Let it mix for about a minute. This is when it gets tricky. Slowly pour a steady trickle of half & half into the moving mixer. Keep pouring. It will form a giant mass that will climb the sides of the bowl and try to escape. Jam the dough back into the bowl and keep pouring. Repeat several times. You may have to turn the mixer off, remove the hook, and wrestle the dough back into the bowl, turning it to get the flour at the bottom. This is probably too much dough for my small mixer, but I make it work.

Now you must work quickly because your giant, hot, Satan-like hands will begin to melt the butter as you press the dough into a flat disc on the counter – around 1 inch thick.

Use a cookie cutter to stamp out your scones – don’t use the edges – you will need to cut into the dough in order for the scones to rise and develop butter-capturing nooks and crannies on the sides. Press the scraps into another disc and repeat as necessary, but by the third cut your molten, lava-like hands will start over-working the dough and melting the butter. Form a small, lumpy patty with the last scrap of dough. This will not bake evenly or look the least bit appetizing. Another option is to form two discs from the start and cut them into wedges, but I don’t think they cook as evenly – the pointy parts get dry and crumbly.
Arrange your scones on the parchment paper with your scalding, furnace-like hands so that they’re just barely touching each other. This will also help them rise for scientific reasons unknown to me. Remember that lone egg? Beat it up and brush the tops of your scones, then sprinkle sugar on top of that to ensure crispy, sweet brown tops.

You can see the sad, misshapen little monster in the corner.
Bake for around 25 minutes – again your oven may vary, as may the circumference of your cookie cutters. Keep an eye on the bottoms for scorching. Voila!

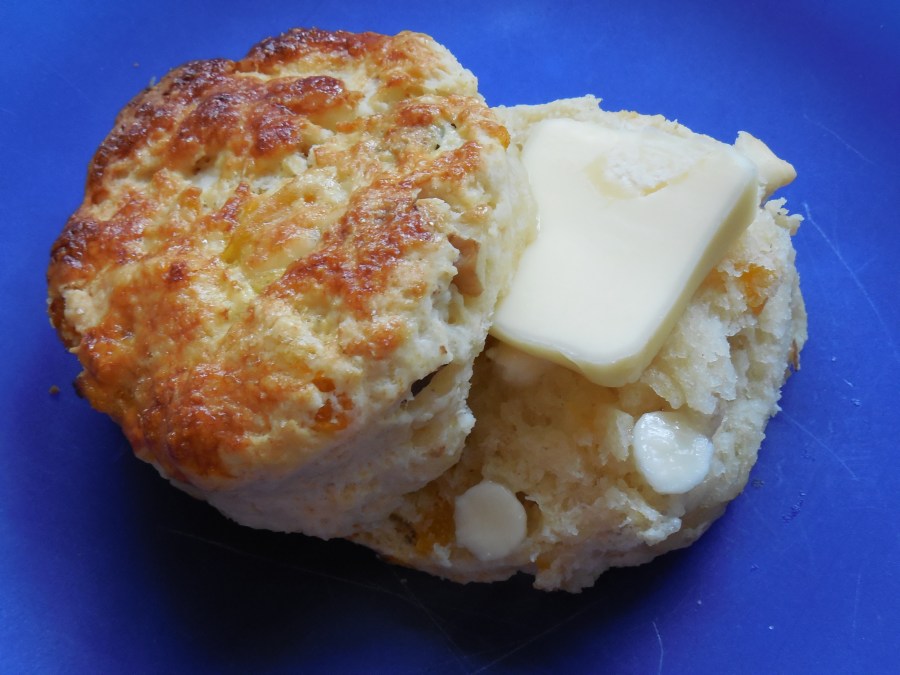
This recipe will make anywhere from 20 to 24 scones, depending again on the size of your cookie cutter. They are best served warm, topped with an obnoxious amount of even more butter, or apricot jam if you want to fool yourself into thinking these are the least bit healthy. Eat them with your liquid-hot magma hands. Now I’m going to join the throngs of people posting photographs of their backyards on Facebook. I leave you with a scene from The Simpson’s spoof of “The Shining”, titled “The Shinning”:
Homer: No TV and no beer make Homer…Something, something.
Marge: Go crazy?
Homer: Don’t mind if I do!
