Or the story of a sublimely happy dog.

I haven’t attempted anything truly ambitious lately. Work has been so crazy-making and stressful that all I want to do when I get home is sit on the couch and eat cheese. So today is a compromise – this is an impressive and ambitious project, but one that I’m already pretty good at. A few years ago I got interested in fresh pasta after a pasta company started selling their wares at our Farmer’s Market and I thought to myself, “How hard can that be?” So I purchased an old hand-crank Atlas from eBay, cleaned it up with a wire brush and got rolling. After a little trial and error, I found out that this might come naturally to me. I spend a lot of time on food websites, and found that people have problems with dough being too sticky, too dry, the pasta gets too brittle, it tastes like raw flour – I think I may have been born for this.
Unfortunately for my readers (hi Mom!), I’m not going to half-ass this, or improvise tools, or otherwise eff it up for your amusement. I can do this. I have the technology. Fortunately this is actually something anyone can do at home with pantry staples. It’s fun and fussy and you sound like a goddess casually talking about dropping your freshly made fettuccine. (“Dropping” pasta is a fancy way of saying you’re putting it into boiling water.)

Here we have the Atlas pasta roller/cutter, which attaches to the countertop with a C-clamp. When mine broke my husband got me a new clamp for Christmas – ah romance! (Unfair and wrong. I asked for one and he went to some degree of trouble to figure out what it was and how to special order one.) Mother tells stories of Nonna rolling her dough out with a three-foot rolling pin and deftly slashing it into equal-sized noodles, but frankly I don’t have the surface area in my little kitchen for that. My cousin Robert still has his nonna’s chitarra, of which I am insanely jealous. Another (thoughtful and romantic) gift is the drying rack. I started out driving nails into the corners of my kitchen and hanging dowel rods on them, kind of creating a teetery ladder to hang the pasta on, but got this amazing folding rack under the Christmas tree as well. (Half-assed substitution – clothes hangers). You will see it in action later. Other tools: a plate, a measuring spoon, and plastic wrap.

Like I said, you can make this today – using nothing more than what’s probably already in your kitchen – you need flour, eggs, olive oil, salt, and water. Let’s talk about flour. You can make this with plain old AP, if that’s all you have. I find the noodles come out a little gummy and taste too flour-y, but it works. Today I’m using a mixture of semolina and “00”, or tipo flour. Semolina is a high-protein, high-gluten flour made from durum wheat, and has a coarse grain that gives you a hearty noodle, but it’s also the very dickens to knead. “00” flour is a very fine soft white flour that is low in gluten and is also the very dickens to find. I purchased this at a pasta shop in Oxford over the summer. What? Why yes, I did board an international flight with a two pound bag of white powder in my backpack. Through some miracle I was not stopped, arrested, and probed by the authorities. Maybe not my smartest move, but it all ended well. I’ve been using 100% semolina mostly, but the addition of “00” flour gives the noodles a smoother texture and silkiness.
Science break!
Wheat flour contains both glutenin and gliadin. Add some water and elbow grease in the form of kneading, and they form gluten – long protein strands that makes bread dough stretchy, muffins dense, and cookies chewy. The whole gluten-free/gluten-allergy/ gluten-intolerance/celiac disease debate is something into which I do not want to get. This recipe (adapted from the recipe on the back of Bob’s Red Mill Semolina Flour) is all about gluten development. Yes, while the rest of the civilized world runs screaming from gluten, I’m trying to create it. Science! Dr. Glutenstein at your service. (It’s pronounced “Glutenschteen”).
Let the eggs come to room temperature – this will make kneading easier. Now mix the dry ingredients together:
¾ C Semolina Flour
¾ C “00” Flour
(or whatever flour you have on hand – one and half cups total)
One teaspoon salt.
(I’m using popcorn salt, which is finer ground than table salt, but table salt works just fine.)
Pour onto a plate and “make a well” or a little hill with a dip in it. Add 2 eggs, two tablespoons of olive oil, and a tablespoon of water into the middle of the well.

Now knead. It will be sticky and upsetting. It will cling to your cuticles and clump unpleasantly between your fingers. It will feel dry and gritty. Of course now your nose will start itching madly. Scratch with your shoulder as best you can.

You have to continue kneading for ten minutes, which will count as your workout for the day. Eventually it will come together and start to feel smooth and rubbery. If it feels too dry, add water by the teaspoon. This takes experience and intuition, but the recipe is pretty solid and you shouldn’t have too much trouble. At the end of the ten minutes, you will have a smooth soft ball of dough that will be roughly the size of, and feel strangely like the head of a Cabbage Patch kid. That’s the best description I can come up with.

Wrap the ball snugly in plastic wrap and stick it in the fridge for about thirty minutes. You just created a lot of gluten strands – “resting” the dough allows them to “relax” so your noodles will not be tough. You do, however, need enough tense gluten to allow the pasta to keep its shape and give it a little bite – “toothiness” is a word used to describe a hearty noodle.
Now the fun and challenging part, during which it would be helpful to have interns. I open my amazing drying rack and set it close to the roller.

Seriously, like, the best gift ever. Cut the dough in half and stick half back in the fridge. This is how I roll. Let’s rock and roll. There are too many pun options, so I’ll just move ahead. Set the roller on the widest setting – here it’s #1. Flatten your dough as best you can and feed it into the roller while turning the crank. It will go through easily enough, but fall into shaggy chunks.

Smoosh the pieces together and feed again. That’s better. Fold it over once and feed it through again – now it’s starting to look presentable.

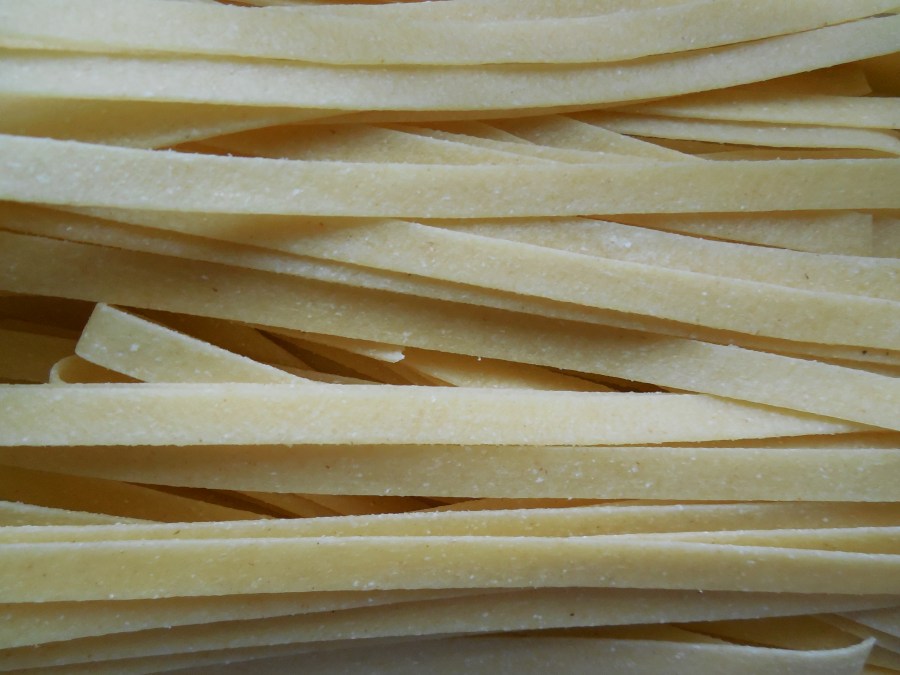
Turn the roller to #2 and feed it through again. Turn to #3 and continue. Around roll #3 or #4, I cut my dough into halves or thirds, so I’m not dealing with three to four feet at a time. This batch I take up to #6, the second-thinnest. Hang the sheets on your drying rack as you go. Let them sit for around five minutes – they will cut cleaner if they’re a little stiff.
Now is the most fun part of all – move the crank handle to the cutting feature – my machine has two settings: fettuccine and spaghetti. So far my spaghetti has been too brittle to handle, so I’m sticking with fettuccine. Carefully feed the dough in while turning the crank. Simultaneously catch the noodles coming out. This is where interns would come in handy. If you drop the dough it will stretch as it feeds, resulting in uneven noodles. If you don’t catch the noodles, they may stick together and tear when you try to separate them. It’s a puzzlement.

Carefully hang the noodles on your drying rack (dowel rod/chopstick/clean pencil/clothes hanger) and very carefully separate them if they stick together. Try not to stretch them. Remove any shaggy edge pieces and drop them to your side, where a dog who loves pasta dough is waiting with an open mouth. She will love you for this. Use kitchen shears to trim the ends of the shag. Continue with the remaining sheets and dough.

Pretty darn impressive, right?
Let dry for thirty minutes or so, then gently remove the noodles and place in a airtight container. They will keep in the fridge for three or four days. Or if you like, gently remove the noodles and drop straight into a pot of boiling water. Insert into mouth. As I gift pasta from time to time, the first question everyone asks is how long to cook it (after first expressing amazement, extreme gratefulness, embarrassing praise, etc.). The answer is a resounding, “I don’t know.”, since every batch turns out a bit differently – the size of the egg, the moisture content of the flour, hell even the relative humidity in your fridge can affect it. If you don’t know how to boil and test noodles… Boil until they’re done. Or I can be more gracious and advise you to cook them to your preferred level of al dente-ness. Fresh pasta will cook faster than dried though, so keep an eye on it.
This recipe makes almost one pound of fresh fettuccine – enough for two meals or four sides. In the future we’ll work on coloring and flavoring the pasta – spinach, herbs, tomato, roasted red pepper. I might even give ravioli another try – if you saw the state of my house after my first attempt, you would appreciate the ambition.
Bonus: Sum total of dishes to wash: 2 – one plate, one measuring spoon. The machine cannot be submerged or put in the dishwasher – just keep it wiped down and if it gets dusty, make up a dummy dough and roll it through a few times before you start – it will pick up any dust, funk, or grime that may occur. The rack gets wiped with a wet cloth, air dries, and goes back into the box.
